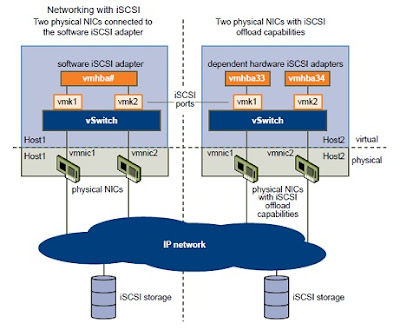
With the software iSCSI, you can use multiple NICs that provide failover and load balancing capabilities for iSCSI connections between your host and storage systems.
For this setup, because multipathing plug-ins do not have direct access to physical NICs on your host,
(1) Connect each physical NIC to a separate VMkernel port.
(2) Associate all VMkernel ports with the software iSCSI initiator using a port binding technique. As a result, each VMkernel port connected to a separate NIC becomes a different path that the iSCSI storage stack and its storage-aware multipathing plug-ins can use.
Refer “Networking Configuration for Software iSCSI and Dependent Hardware iSCSI,” on page 71.

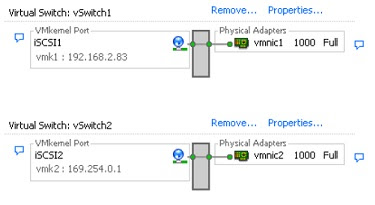
Method #1: iSCSI Ports and NICs on Seperate vSwitches

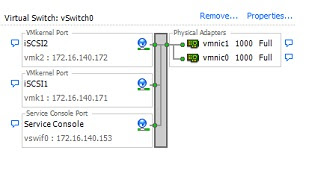
Method #2: iSCSI Ports and NICs on a single vSwitch
This lab environment use iSCSI ports and NICs on a single vswitch configuration. vSwitch0 have 1 service console port and 2 VMkernel ports for iSCSI traffic.

Create Additional iSCSI Ports for Multiple NICs
Use this task if you have two or more NICs you can designate for iSCSI and you want to connect all of your iSCSI NICs to a single vSwitch. In this task, you associate VMkernel iSCSI ports with the network adapters using 1:1 mapping.
You now need to connect additional NICs to the existing vSwitch and map them to corresponding iSCSI ports.
NOTE If you use a vNetwork Distributed Switch with multiple dvUplinks, for port binding, create a separate dvPort group per each physical NIC. Then set the team policy so that each dvPort group has only one active dvUplink. For detailed information on vNetwork Distributed Switches, see the Networking section.
Prerequisites
You must create a vSwitch that maps an iSCSI port to a physical NIC designated for iSCSI traffic.
Procedure
1 Log in to the vSphere Client and select the host from the inventory panel.
2 Click the Configuration tab and click Networking.
3 Select the vSwitch that you use for iSCSI and click Properties.
4 Connect additional network adapters to the vSwitch.
- In the vSwitch Properties dialog box, click the Network Adapters tab and click Add.
- Select one or more NICs from the list and click Next. With dependent hardware iSCSI adapters, make sure to select only those NICs that have a corresponding iSCSI component.
- Review the information on the Adapter Summary page, and click Finish.
5 Create iSCSI ports for all NICs that you connected. The number of iSCSI ports must correspond to the number of NICs on the vSwitch.
- In the vSwitch Properties dialog box, click the Ports tab and click Add.
- Select VMkernel and click Next.
- Under Port Group Properties, enter a network label, for example iSCSI, and click Next.
- Specify the IP settings and click Next.
connects to.
- Review the information and click Finish.
6 Map each iSCSI port to just one active NIC.
By default, for each iSCSI port on the vSwitch, all network adapters appear as active. You must override this setup, so that each port maps to only one corresponding active NIC. For example, iSCSI port vmk1 maps to vmnic1, port vmk2 maps to vmnic2, and so on.
- On the Ports tab, select an iSCSI port and click Edit.
- Click the NIC Teaming tab and select Override vSwitch failover order.
- Designate only one adapter as active and move all remaining adapters to the Unused Adapters category.
What to do next
After performing this task, use the esxcli command to bind the iSCSI ports to the software iSCSI or dependent hardware iSCSI adapters.
[root@esx1 ~] # esxcli swiscsi nic add -n vmk1 -d vmhba33
[root@esx1 ~] # esxcli swiscsi nic add -n vmk2 -d vmhba33
[root@esx1 ~]# esxcli swiscsi nic list -d vmhba33
vmk1
pNic name: vmnic0
ipv4 address: 172.16.140.171
ipv4 net mask: 255.255.255.0
ipv6 addresses:
mac address: 00:0c:29:f1:5a:5b
mtu: 1500
toe: false
tso: true
tcp checksum: false
vlan: true
vlanId: 0
ports reserved: 63488~65536
link connected: true
ethernet speed: 1000
packets received: 59160
packets sent: 31618
NIC driver: e1000
driver version: 8.0.3.2-1vmw-NAPI
firmware version: N/A
vmk2
pNic name: vmnic1
ipv4 address: 172.16.140.172
ipv4 net mask: 255.255.255.0
ipv6 addresses:
mac address: 00:0c:29:f1:5a:51
mtu: 1500
toe: false
tso: true
tcp checksum: false
vlan: true
vlanId: 0
ports reserved: 63488~65536
link connected: true
ethernet speed: 1000
packets received: 90325
packets sent: 451
NIC driver: e1000
driver version: 8.0.3.2-1vmw-NAPI
firmware version: N/A
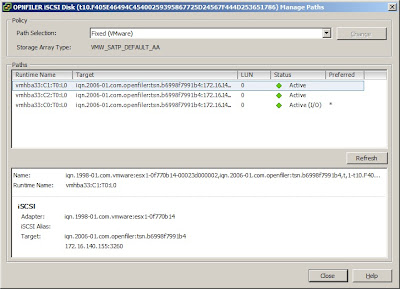
Configuration -> Storage -> Select iSCSI storage -> Properties -> click "Manage Paths" to see available paths for the storage.

No comments:
Post a Comment